Android
About OpenGL †
OpenGL ES (OpenGL for Embedded Systems) is a 2D/3D graphics API for embedded systems, such as smart phones and hand-held-portable game devices. This is a subset of OpenGL, which is cross-platform and royalty-free. OpenGL ES is used in iOS, and Android, PS3, Nintendo 3D and so on.
- OpenGL ES: The Standard for Embedded Accelerated 3D Graphics
Basic knowledge of OpenGL ES †
Version †
There are roughly two different versions of OpenGL ES.
- OpenGL ES 1.x
- Rendering is done by Fixed-Function Pipeline
[Fixed-Function Pipeline]
Vertex coordinates → Model-view transformation → Projective transformation → Viewport transformation → Rendering
- OpenGL ES 2.x
- In stead of using “Fixed-Function Pipeline,” this employs Programmable Shaders. In Programable Shaders, programers can configure individually vertex coordinates, the information of transformation, and the method of pixel rendering for own needs.
[Programable Shaders]
Vertex coordinates → Programable Shaders → Rendering
This article discusses OpenGL ES 1.x Fixed-Function Pipeline.
Coordinates †
>
In OpenGL, x-axis, y-axis, and z-axis are considered as width height, and depth, respectively.
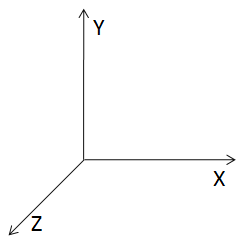
Figure1: Coordinates of OpenGL ES
State Machine †
OpenGL ES is a state machine, which executes the predetermined commands in the predetermined conditions and orders on a matrix. The latest command is always executed on the latest form of a matrix (not its original form).
Matrix †
Open GL employs two different types of matrices. One is the projective transformation matrix, which is used for determining the direction to look at the model and the degree of viewing angle. The other one is the model transformation matrix, which handles to move, to rotate, to enlarge, and to reduce a model.

Vertex coordinates †
A point (X, Y, Z, W) is a set of coordinates. To define a point in 3-dimension, usually, it is written as (X, Y, Z, 1). However, a point in 3-dimension is defined as (X/W, Y/W, Z/W). if W is zero, this means a 3-dimensional vector.
Vertex coordinates

Model-view transformation †
Model-view transformation configures parallel translation, rotation, and enlargement/reduction of a matrix with the model-view transformation matrix.
To use a set of translated vertex coordinates and a model translation matrix, you can calculate the model-view translation matrix by yourself. There are useful commands, and the use of these commands is highly recommended.
Parallel translation: glTranslatef()
Rotation: glRotatef()
Enlargement/Reduction: glScalef()
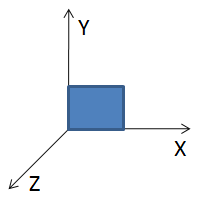
Figure2: Original
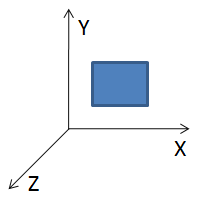
Figure3: Parallel Traslation
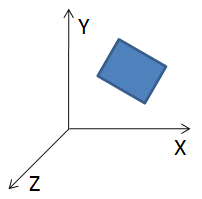
Figure4: Rotation
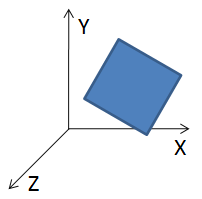
Figure5: Enlargement / Reduction
Projective transformation †
To use the projective transformation matrix, Projective transformation sets up how the model can be seen. The direction of view point, degree of view angle, and ratio between width and hight of the screen.
Viewport transformation †
The ratio of screen, which displays the sean, is configured.
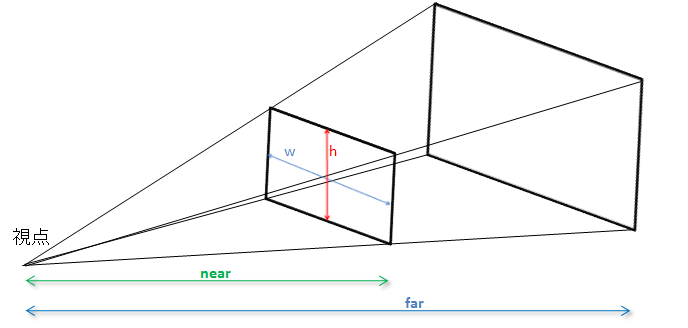
Figure6: projective transformation and viewport transformation
“w” and “h” constitute the ratio of screen (Viewport)
“near” and “far” indicate distance between the view point and the near grip surface and far grip surface, respectively. A distance are measured between the view point and each a surface.
Commands that removed from OpenGL †
Since OpenGL ES is a subset of OpenGL, some functions of OpenGL are not ported to OpenGL ES. The list below shows the commands, which are removed as OpenGL is ported for embedded systems. If you need to execute an OpenGL program on OpenGL ES environment, you have to find and use the suitable replacements.
Geometry related commands †
- glBegin, glEnd: input vertex coordinates
- double (order form), glMultMatrixd, glTranslated
- Polygon is triangle only
- Evaluator
- Display list
- Texture-coordinate generator
Vertex coordinates related commands †
- User clip
- A matrix calculation on the vertex color
Vertex lightning related †
- Index color mode (RGBA color mode only)
- Configure a material on back surface
- Local viewer, Separate specular color
Rasterization related †
- glPolygonMode, glLineStipple, glPoygonStipple
- Anti-alias polygon
Texture related †
- Single-Dimension, 3-Dimension, Cube map texture
- Texture format, Texture function
Others †
- Bitmap drawing, glDrawPixels, glBitmap
- State acquisitio
- Current raster position, Pixel processing
- Attribute stacks
Using OpenGL ES on Android †
On Android, OpenGL ES can work with both Java and NDK (Android Native Development Toolkit). In this section explains how to use OpenGL ES on Java version of Android. The diagram below shows a basic configuration for applying OpenGL ES to an Android application.
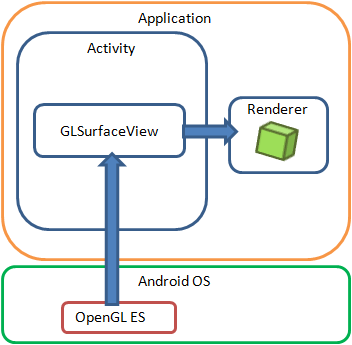
Figure7: OpenGL ES on Android
About Class †
As using OpenGL ES on Android, two classes are required One is “GLSurfaceView,” and the other is “GLSurfaceView.Renderer.” Briefly explain about these classes.
GLSurfaceView
- GLSurfaceView is a subclass of SurfaceView and is capable of processing OpenGL ES.
- It puts specific threads, which are separated form UI threads.
- It can handle continued rendering and on-demand rendering
- It does trace and error checking as this is called
Method
- onTouchEvent()
- It is similar to View, it notes the handling of touch-screen operations.
(i.e. By touch-screen operations, shift and/or rotate the model, or change (enlarge/reduce) the size of the model.)
GLSurfaceView.Renderer
- Render the frame
- A class that inherits from this class is needed to to be created, the new class has to be registered as (setRenderer()) to GLSurfaceView.
Method
- onSurfaceCreated()
- This method is called as a surface has been created.
- As the state of a device is shifted from sleep to resume, in some case, its context may be lost. As the context disappears, the resources, which tag to the context also disappear. If this happens, the resources are needed to be recreated for continuing its rendering process. “OnSurfaceCreated() can be employed for recreating resources.
- onSurfaceChanged()
- This method is called as the size of screen has been changed.
- Usually, the configuration of Viewport can be done with this class.
- onDrawFrame()
- “onDrawFrame()” method is called when the frame is about being rendered.
- THe information, which is required for rendering, is need to be defined within this methoid.
To adjust the state of Activity †
“onResume()” and “onPause()” of GLSurfaceView are can be called from “onResume()” and “onPause()” of Activity, respectively. These allow the sifts of OpenGL ES synchronizing the life cycle of Activity. As Activity is paused (by “onPause()” method),the rendering process of OpenGL ES is also paused. When Activity is resumed by (“onResume()” method), the suspended rendering process is also resumed.
Debug Process †
GLSurfaceView Does have useful functions for debugging OpenGL ES.
The method of “GLSurfaceView.setDebugFlags(),” configures to call out the logs against OpenGL ES and to make its error check effective. Before calling up setRenderer() by the Constructor of GLSurfaceView, this method is needed to be called.
setDebugFlags(DEBUG_CHECK_GL_ERROR|DEBUG_LOG_GL_CALLS)
GLSurfaceView.DEBUG_LOG_GL_CALLS:
As the commands of OpenGL ES are executed , logs are output to its debugger(LogCat).
GLSurfaceView.DEBUG_CHECK_GL_ERROR:
Errors occur as the commands of OpenGL ES are executed, and this is reporting on Debugger (LogCat).
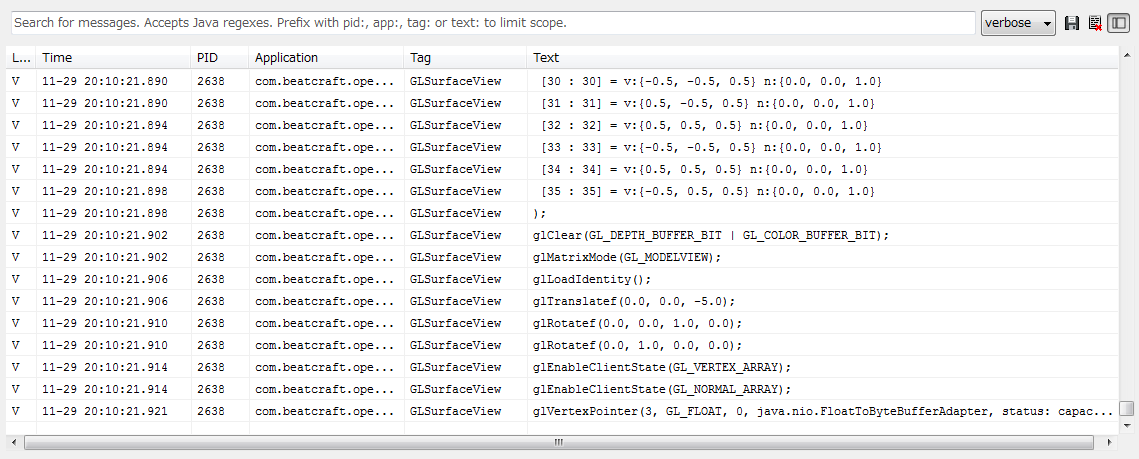
Figure8: Debug outputs
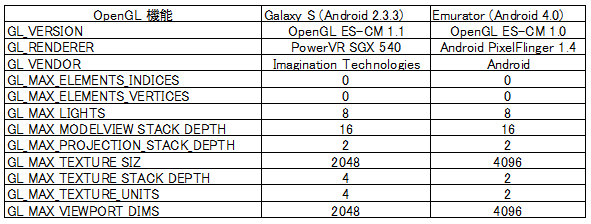
To work with many different devices †
Currently, Android supports many different types of devices. Some devices may support both OpenGL ES 1.1 and ES 2.0. The other devices handle only OpenGL ES 1.1. Even though two device are installed the same version of OpenGL, their hardware will make the difference. The hardware specifications limit the capability of OpenGL ES.
To utilize the functions of OpenGL ES fully, the specifications of targeted devices and the functions of OpenGL ES for such specifications are needed to be understood.
To examine which functions are supported, glGetString() is called with the following parameters.
GL_EXTENSIONS:
GL_RENDERER:
GL_VENDOR
GL_VERSION
The list of the functions, which are limited on OpenGL ES(1.0)
Sample Program †
This is a sample program, which display a cube and let it rotate by touch operation.
Activity
001:package com.beatcraft.opengl1;
002:
003:import com.beatcraft.opengl1.GLView;
004:
005:import android.app.Activity;
006:import android.os.Bundle;
007:
008:public class OpenGL1 extends Activity {
009:	GLView mGLView;
010:
011:    @Override
012:    public void onCreate(Bundle savedInstanceState) {
013:        super.onCreate(savedInstanceState);
014:        mGLView = new GLView(this);
015:        setContentView(mGLView);
016:    }
017:    @Override
018:    protected void onPause() {
019:    	super.onPause();
020:    	mGLView.onPause();
021:    }
022:    @Override
023:    protected void onResume() {
024:    	super.onResume() ;
025:    	mGLView.onResume();
026:    }
027:}
At line #09: “GLVew”, a derived class of “GLSurfaceView,” is used for a variable.
At line #14: An instance of GLView
At line #15: GLView is pasted on Activity
At line #20: As Activity is posed (onPause()), GLView is also paused.
At line #25: When Activity is resumed, GLView is also resumed.
View (GLView)
001:package com.beatcraft.opengl1;
002:
003:import android.content.Context;
004:import android.opengl.GLSurfaceView;
005:import android.util.Log;
006:import android.view.MotionEvent;
007:
008:public class GLView extends GLSurfaceView {
009:    private GLRenderer mGLRenderer;
010:    private final float TOUCH_SCALE_FACTOR = 180.0f / 320;
011:    private float mPreviousX;
012:    private float mPreviousY;
013:
014:	public GLView(Context context) {
015:	  super(context);
016:	  mGLRenderer = new GLRenderer();
017: 	  setDebugFlags(DEBUG_CHECK_GL_ERROR
 						| DEBUG_LOG_GL_CALLS);
018:  	  setRenderer(mGLRenderer);
019:	}
020:
021:	@Override
022:	public boolean onTouchEvent(MotionEvent event) {
023:        float x = event.getX();
024:        float y = event.getY();
025:        switch (event.getAction()) {
026:        case MotionEvent.ACTION_MOVE:
027:            float dx = x - mPreviousX;
028:            float dy = y - mPreviousY;
029:            mGLRenderer.mRotate_x += dx * TOUCH_SCALE_FACTOR;
030:            mGLRenderer.mRotate_y += dy * TOUCH_SCALE_FACTOR;
031:        }
032:        mPreviousX = x;
033:        mPreviousY = y;
034:
035:        return true;
036:	}
037:}
At line #08: GLView, which is inherited from GLSurfaceView, is configured.
At line #09: A class of GLRenderer, which implements the interface of Renderer, is treated as a variable.
At line #16: An instance of GLRenderer is created.
At line #17: The debug mode of OpenGL ES is set
At line #18: An instance of GLRenderer is registered to GLSurfaceView
At line #21 ~: A series of Processes as screen is touched. A finger is moved while it touches screen, the distance of X- and Y- axises are transferred to the rotation angle, and the rotation angle of becomes the variable of GLRenderer.
Renderer (GLRenderer)
001:package com.beatcraft.opengl1;
002:
003:import java.nio.ByteBuffer;
004:import java.nio.ByteOrder;
005:import java.nio.FloatBuffer;
006:
007:import javax.microedition.khronos.egl.EGLConfig;
008:import javax.microedition.khronos.opengles.GL10;
009:
010:import android.opengl.GLSurfaceView.Renderer;
011:
012:public class GLRenderer implements Renderer {
013:
…
124:  @Override
125:  public void onSurfaceCreated(GL10 gl, EGLConfig arg1) {
126:    // Initialize Coordinates.
127:    gl.glLoadIdentity();
128:    //  Depth Buffer Test makes effective.
129:    gl.glEnable(GL10.GL_DEPTH_TEST);
130:    //  the operations of dark surface removal is configured.
131:    gl.glDepthFunc(GL10.GL_LEQUAL);
132:    //  The light is enabled.
133:    gl.glEnable(GL10.GL_LIGHTING);
134:    //  The light source is specified.
135:   gl.glEnable(GL10.GL_LIGHT0);
136:
137:   //  The vertex array and normal array is set at Buffer
138:   setBuffer();
139:  }
140:
141:  @Override
142:  public void onSurfaceChanged(GL10 gl, int width, int height) {
143:    //  Display ratio
144:    float ratio = (float) width / height;
145:    //  Configuration of viewport
146:    gl.glViewport(0, 0, width, height);
147:    //  Setting up the projective matrix
148:    gl.glMatrixMode(GL10.GL_PROJECTION);
149:    gl.glLoadIdentity();
150:    //  Configuration of angle (left,right,bottom,top,near,far)
151:    gl.glFrustumf(-ratio, ratio, -1, 1, 1, 1000);
152:  }
At line # 125: As a surface is created, this is called.
At line # 142: As the size of a surface is changed, “onSurfaceChanged()” is called.
At line # 146: This is a configuration of a viewport. Ratio between width and hight is adjusted (please look at Figure 5 for the reference.)
At line # 148: This configures a projective matrix. After this command, the transformations are done on the matrix, which is reshaped by the projective matrix here.
At line # 151: This sets up the view volume. The area between the small cube, which is located at the front, and the large cube, which is placed at back, is configured.
Renderer (GLRenderer) (Continued)
- GLRenderer.java (Continued)
154:  @Override
155:  public void onDrawFrame(GL10 gl) {
156:    //  Display Screen and clear depth buffer
157:    gl.glClear(GL10.GL_COLOR_BUFFER_BIT | GL10.GL_DEPTH_BUFFER_BIT);
158:    //  Specify a model-view matrix
159:    gl.glMatrixMode(GL10.GL_MODELVIEW);
160:    //  Initialize the coordinates
161:    gl.glLoadIdentity();
162:    //  Translation (At Z-axis: Move to back)
163:    gl.glTranslatef(0, 0, -5f);
164:    //  Rotation
165:    gl.glRotatef(mRotate_x, 0, 1, 0);
166:    gl.glRotatef(mRotate_y, 1, 0, 0);
167:    //  The vertex array makes effective.
168:    gl.glEnableClientState(GL10.GL_VERTEX_ARRAY);
169:    //  The normal array mekes effective.
170:    gl.glEnableClientState(GL10.GL_NORMAL_ARRAY);
171:    //  The set of vertex array
172:    gl.glVertexPointer(3, GL10.GL_FLOAT, 0, mVertexBuffer);
173:    //  The set of normal array
174:    gl.glNormalPointer(GL10.GL_FLOAT, 0, mNormalBuffer);
175:    //  Rendering (GL_TRIANGLES: Triangles)
176:    gl.glDrawArrays(GL10.GL_TRIANGLES, 0, mVertexBuffer.remaining() / 3);
177:  }
…
193:}
At line # 155: Each time image is rendered, this is executed.
At line # 159: It is the configuration of a model-view matrix. After this command, the commands are effective on this translated model.
At line #165-166: Based upon the results of touch operations, the rotation angle is calculated. (Please look at Figure 3 for the details.)
At line # 176: From the vertex of the cube, a triangle is rendered.
Screen Shot
As touching the screen and sliding a finger, the cube is rotated.
Model data (.obj) †
“.obj” file is an output file of Advanced Visualizer, which is an application created at WaveFront Technologies. A lot of 3D applications support this format.
Its extension is “.obj” and its file format is text style. The data that stores in the file are vertex coordinates, normal coordinates, and texture coordinates.
- Comments:
- #: The line that starts with “#” is a line of comment.
- Vertex Coordinates:
- v: “v” indicates that this line is the information of a set of vertex coordinates.
- Texture Coordinates:
- vt: This line, which begins with “vt”, indicates the information of a set of texture vertex coordinates.
- Normal Coordinates:
- vn: “vn” indicates this line is a set of normal coordinates.
- face
- f: “f” defines the vertex coordinates, texture coordinates, and normal coordinates against the vertex of the object. The notification rules are shown below.
f number/number/number ---> vertex coordinates/texture coordinates/normal coordinates
f number//number ----> vertex coordinates//normal coordinates
f numer ----> vertex coordinates
The index is started from the value, whose top digit stats with 1.
Examples of displaying 3D (.obj) model data
Revision History †
- 2012/3/23 The article is initially uploaded.
![[PukiWiki] [PukiWiki]](image/bc_logo.png)
![[PukiWiki] [PukiWiki]](image/bc_logo.png)