![[BC::Labs] [BC::Labs]](image/bc_logo.png)
![[BC::Labs] [BC::Labs]](image/bc_logo.png)
Armadillo-Box WS1/fluentd で設定した送信側の fluentd から送られたログを
受信して収集するサーバーの設定手順を記述します。
flunetd で受信したログは elasticsearch と mongodb に格納し、
elasticsearch のログは kibana を使い web 経由で確認できるようにします。
OS は2015年11月時点で最新の LTS (Long term support) である
Ubuntu 14.04 LTS の server 版を使用します。
ホスト名や固定IPアドレスの設定、セキュリティ対策のファイヤウォールルール設定などは
使用するネットワーク環境に応じて適宜行います。
本文書内では以下の設定を使用しています。
ホスト名:aggregator
ユーザー名:beat
Ubuntu のリポジトリにある方でなく、MongoDB のリポジトリのものを
Install MongoDB on Ubuntu
https://docs.mongodb.org/master/tutorial/install-mongodb-on-ubuntu/?_ga=1.172844773.758522867.1438600602
に従ってインストールします。
beat@aggregator:~$ sudo apt-key adv --keyserver hkp://keyserver.ubuntu.com:80 --recv 7F0CEB10
Executing: gpg --ignore-time-conflict --no-options --no-default-keyring --homedir /tmp/tmp.0CJX1sXM4s --no-auto-check-trustdb \
--trust-model always --keyring /etc/apt/trusted.gpg --primary-keyring /etc/apt/trusted.gpg --keyserver hkp://keyserver.ubuntu.com:80 --recv 7F0CEB10
gpg: requesting key 7F0CEB10 from hkp server keyserver.ubuntu.com
gpg: key 7F0CEB10: public key "Richard Kreuter <richard@10gen.com>" imported
gpg: Total number processed: 1
gpg:               imported: 1  (RSA: 1)
beat@aggregator:~$ echo "deb http://repo.mongodb.org/apt/ubuntu "$(lsb_release -sc)"/mongodb-org/3.0 multiverse" | sudo tee /etc/apt/sources.list.d/mongodb-org-3.0.list
beat@aggregator:~$ sudo apt-get update
追加した MongoDB リポジトリの mongodb パッケージ(mongodb-org)をインストールします。
beat@aggregator:~$ sudo apt-get install mongodb-org
deb パッケージのインストール後 MongoDB はすぐ使用できる状態になっていますが、
mongo コマンドで mongo shell にアクセスすると Transparent Huge Pages 有効に対するワーニングが出ます。
公式ドキュメントの対応法に従ってこれに対応します。
https://docs.mongodb.org/manual/tutorial/transparent-huge-pages/#transparent-huge-pages-thp-settings
/etc/init.d/ に以下の内容の disable-transparent-hugepages を作成します。
#!/bin/sh
### BEGIN INIT INFO
# Provides:          disable-transparent-hugepages
# Required-Start:    $local_fs
# Required-Stop:
# X-Start-Before:    mongod mongodb-mms-automation-agent
# Default-Start:     2 3 4 5
# Default-Stop:      0 1 6
# Short-Description: Disable Linux transparent huge pages
# Description:       Disable Linux transparent huge pages, to improve
#                    database performance.
### END INIT INFO

case $1 in
  start)
    if [ -d /sys/kernel/mm/transparent_hugepage ]; then
      thp_path=/sys/kernel/mm/transparent_hugepage
    elif [ -d /sys/kernel/mm/redhat_transparent_hugepage ]; then
      thp_path=/sys/kernel/mm/redhat_transparent_hugepage
    else
      return 0
    fi

    echo 'never' > ${thp_path}/enabled
    echo 'never' > ${thp_path}/defrag

    unset thp_path
    ;;
esac
作成したら起動時に実行されるよう設定します。
beat@aggregator:~$ sudo chmod 755 /etc/init.d/disable-transparent-hugepages
beat@aggregator:~$ sudo update-rc.d disable-transparent-hugepages defaults
再起動後 mongo shell でワーニングの出ないことを確認します。
beat@aggregator:~$ mongo
MongoDB shell version: 3.0.7
connecting to: test
>
kibana と連携してログを可視化するため全文検索サーバー elasticsearch をインストールし、
Armadillo-Box WS1 からのログを logstash 形式で保存します。
elasticsearch の実行に必要な java をインストールします。
java は 2015年11月現在最新の java8 をインストールします。
beat@aggregator:~$ sudo add-apt-repository ppa:webupd8team/java
beat@aggregator:~$ sudo apt-get update
beat@aggregator:~$ sudo apt-get install oracle-java8-installer
oracle-java8-installer 経由で使用許諾ライセンスに同意を求められます。
同意すると java8 がインストールされます。
公式ドキュメントに従い、リポジトリを追加して elasticsearch をインストールします。
https://www.elastic.co/guide/en/elasticsearch/reference/1.7/setup-repositories.html
beat@aggregator:~$ wget -qO - https://packages.elastic.co/GPG-KEY-elasticsearch | sudo apt-key add -
beat@aggregator:~$ echo "deb http://packages.elastic.co/elasticsearch/1.7/debian stable main" | sudo tee -a /etc/apt/sources.list.d/elasticsearch-1.7.list
beat@aggregator:~$ sudo apt-get update
beat@aggregator:~$ sudo apt-get install elasticsearch
インストールが完了したらサーバーの起動時にサービスとして起動するよう設定します。
beat@aggregator:~$ sudo update-rc.d elasticsearch defaults 95 10
port 9200 にアクセスし動作確認します。
以下のような応答があれば OK です。
beat@aggregator:~$ curl -X GET http://localhost:9200/
{
  "status" : 200,
  "name" : "Red Wolf",
  "cluster_name" : "elasticsearch",
  "version" : {
    "number" : "1.7.3",
    "build_hash" : "05d4530971ef0ea46d0f4fa6ee64dbc8df659682",
    "build_timestamp" : "2015-10-15T09:14:17Z",
    "build_snapshot" : false,
    "lucene_version" : "4.10.4"
  },
  "tagline" : "You Know, for Search"
}
公式ドキュメントの
Configuration
https://www.elastic.co/guide/en/elasticsearch/reference/1.7/setup-configuration.html
や
Running as a Service on Linux
https://www.elastic.co/guide/en/elasticsearch/reference/1.7/setup-service.html
を参考に、開けるファイル数や使用メモリの上限を調整します。
/etc/security/limit.conf に以下を追加し再起動します。
elasticsearch - nofile  65535
elasticsearch - memlock unlimited
/etc/elasticsearch/elasticsearch.yml に以下を追加し、elasticsearch の使用メモリは swap されないようにします。
bootstrap.mlockall: true
/etc/default/elasticsearch に上記二つの設定に対応する設定を追加します。
ES_HEAP_SIZE=1g  <-- 実メモリの半分まで
MAX_OPEN_FILES=65535
MAX_LOCKED_MEMORY=unlimited
Ubuntu のリポジトリの Apache2 をインストールします。
beat@aggregator:~$ sudo apt-get install apache2
設定は default でドキュメントルートも /var/www/ のままです。
必要に応じてセキュリティ対策などを実施してください。
kibana3 をダウンロードし、Apache のドキュメントルートに配置します。
beat@aggregator:~$ bwget https://download.elastic.co/kibana/kibana/kibana-3.1.2.tar.gz
beat@aggregator:~$ tar xvf kibana-3.1.2.tar.gz
beat@aggregator:~$ mv kibana-3.1.2 kibana3
beat@aggregator:~$ sudo mv kibana3 /var/www/html/
kibana3 から elasticsearch の logstash ログを開けるよう、
elasticsearch の設定ファイル
/etc/elasticsearch/elasticsearch.yml
の Security の項に以下を追加します。
http.cors.allow-origin: "/.*/"
http.cors.enabled: true
追加したら elasticsearch を再起動し設定を反映します。
beat@aggregator:~$ sudo /etc/init.d/elasticsearch restart
[sudo] password for beat:
 * Stopping Elasticsearch Server                                         [ OK ]
 * Starting Elasticsearch Server
web ブラウザーで http://{ログ集約サーバーのIPアドレス}/kibana3/ を開き、
ダッシュボードが表示できることを確認します。
flunetd のインストール前に
Before installing
http://docs.fluentd.org/articles/before-install
に従って ulimit を増やします。
/etc/security/limits.conf の末尾に以下を追加、
root soft nofile 65536
root hard nofile 65536
*    soft nofile 65536
*    hard nofile 65536
再起動後反映されたかを確認します。
beat@aggregator:~$ ulimit -n
65536
Installing Fluentd Using Ruby Gem
http://docs.fluentd.org/articles/install-by-gem
に従ってインストールします。
(gem は Ruby のパッケージ管理ツールです。)
まず gem インストールに必要なパッケージをインストールします。
beat@aggregator:~$ sudo apt-get install build-essential
beat@aggregator:~$ sudo apt-get install ruby ruby-dev
fluentd を gem インストールします。
beat@aggregator:~$ sudo gem install fluentd --no-ri --no-rdoc
Fetching: msgpack-0.5.12.gem (100%)
〜〜 中略 〜〜
Fetching: string-scrub-0.0.5.gem (100%)
Building native extensions.  This could take a while...
Fetching: fluentd-0.12.15.gem (100%)
Successfully installed msgpack-0.5.12
Successfully installed json-1.8.3
Successfully installed yajl-ruby-1.2.1
Successfully installed cool.io-1.3.1
Successfully installed http_parser.rb-0.6.0
Successfully installed sigdump-0.2.3
Successfully installed thread_safe-0.3.5
Successfully installed tzinfo-1.2.2
Successfully installed tzinfo-data-1.2015.5
Successfully installed string-scrub-0.0.5
Successfully installed fluentd-0.12.15
11 gems installed
依存関係のあるパッケージといっしょに fluentd がインストールされます。
fluentd から elasticsearch に logstash 形式でログを保存するプラグインをインストールします。
先に必要なライブラリを agt-get でインストールし、その後 gem でインストールします。
beat@aggregator:~$ sudo apt-get install libcurl4-openssl-dev
beat@aggregator:~$ sudo gem install fluent-plugin-elasticsearch
Fetching: excon-0.45.4.gem (100%)
〜〜 中略 〜〜
Fetching: fluent-plugin-elasticsearch-1.0.0.gem (100%)
Successfully installed excon-0.45.4
Successfully installed multi_json-1.11.2
Successfully installed multipart-post-2.0.0
Successfully installed faraday-0.9.1
Successfully installed elasticsearch-transport-1.0.12
Successfully installed elasticsearch-api-1.0.12
Successfully installed elasticsearch-1.0.12
Successfully installed fluent-plugin-elasticsearch-1.0.0
8 gems installed
flunetd から MongoDB にログを保存するプラグインをインストールします。
beat@aggregator:~$ sudo gem install fluent-plugin-mongo
Fetching: bson-1.12.3.gem (100%)
Fetching: mongo-1.12.3.gem (100%)
Fetching: fluent-plugin-mongo-0.7.10.gem (100%)
Successfully installed bson-1.12.3
Successfully installed mongo-1.12.3
Successfully installed fluent-plugin-mongo-0.7.10
3 gems installed
fluentd の設定ファイルを簡潔に記述できるよう、
fluent-plugin-forest
https://rubygems.org/gems/fluent-plugin-forest
をインストールします。
beat@aggregator:~$ sudo gem install fluent-plugin-forest
Fetching: fluent-plugin-forest-0.3.0.gem (100%)
Successfully installed fluent-plugin-forest-0.3.0
1 gem installed
Armadillo-Box WS1/flunetd で設定した fluentd から送信されるログデータを受信する
サーバー側の fluent.conf は以下のようになります。
<source>
  @type forward
  @id forward_input
</source>

<match syslog.**>
  @type forest
  subtype copy
  <template>
    <store>
      type elasticsearch
      logstash_format true
      host localhost
      port 9200
      index_name fluentd
      type_name syslog
      flush_interval 10s
      buffer_chunk_limit 2048k
      buffer_queue_limit 5
      buffer_path /data/tmp/es_syslog/${hostname}.${tag_parts[1]}.${tag_parts[2]}.${tag_parts[3]}
      buffer_type file
    </store>
    <store>
      type mongo
      host localhost
      port 27017
      database fluentd
      collection adv
      capped
      capped_size 4096m
      flush_interval 10s
      buffer_chunk_limit 8192k
      buffer_queue_limit 512
      buffer_path /data/tmp/mongo_syslog/${hostname}.${tag_parts[1]}.${tag_parts[2]}.${tag_parts[3]}
      buffer_type file
    </store>
    <store>
      type file
      path /data/tmp/syslog/${hostname}.${tag_parts[1]}.${tag_parts[2]}.${tag_parts[3]}.log
      buffer_path /data/tmp/syslog/${hostname}.${tag_parts[1]}.${tag_parts[2]}.${tag_parts[3]}
      flush_interval 10s
      buffer_chunk_limit 8192k
      buffer_queue_limit 512
      buffer_type file
    </store>
  </template>
</match>
buffer_type を file にしてありますので、
file が作成される path を予め適切に作成しておく必要があります。
この例では /data/tmp/ の下に elasticsearch 用、mongodb 用、file 用の path をそれぞれ作成しておく必要があります。
flunetd をログオプション付きで起動し、
が正常に行えるか確認します。
beat@aggregator:~$ sudo -s
root@aggregator:~# fleuntd -c /etc/fluent/fluent.conf -o /var/log/fluent.log &
root@aggregator:~# tail -f /var/log/fluent.log
正常に実行されていることを確認できたら
http://{ログ集約サーバーのIP}/kibana3/
を開きます。
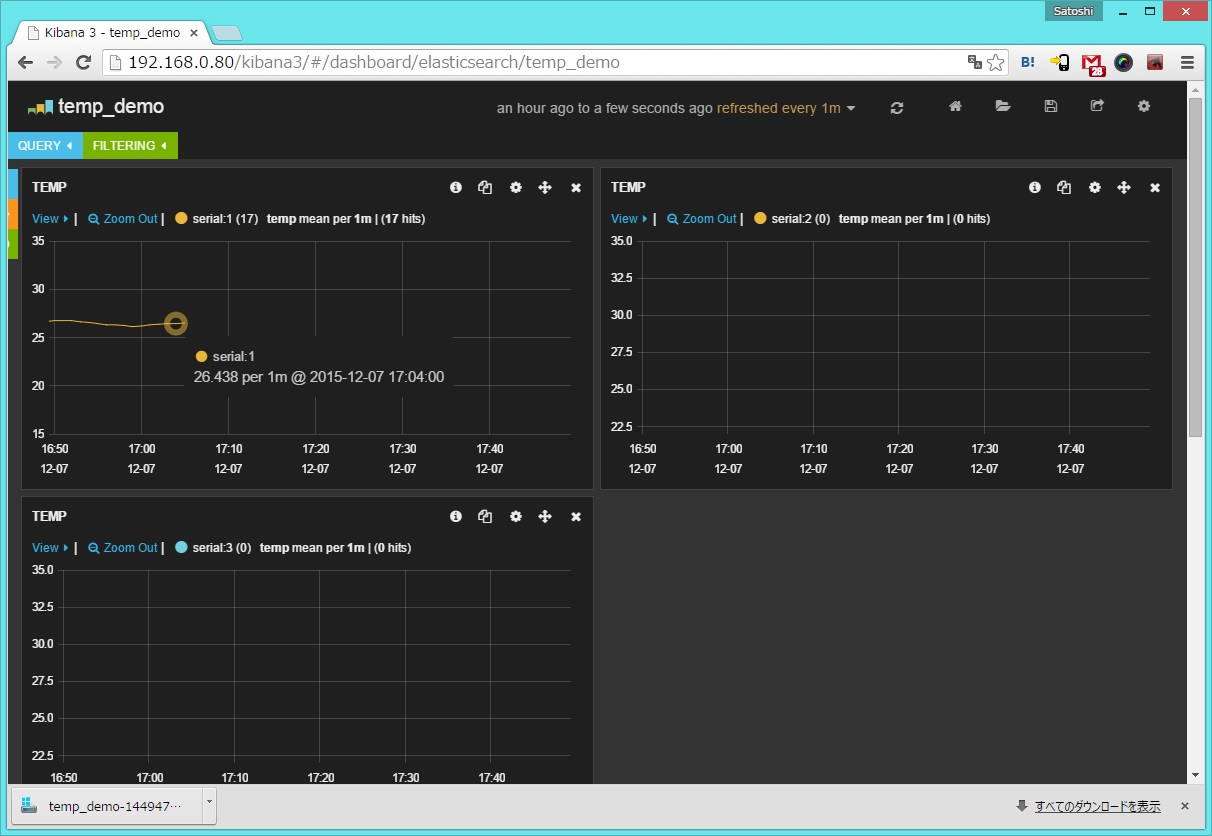
ログデータが貯まるにつれて、
15℃から35℃までの温度変化を一分おきに表示するよう設定しておいたkibana3のダッシュボードに
温度変化のグラフが更新されていきます。

全体として正常に動作することを確認できたら、
setup-fluentd-initscript.sh
https://gist.github.com/Leechael/3671811
などを利用してログ集約サーバー起動時に fluentd も自動起動するよう設定してもいいでしょう。